Import App into Android Studio
After WordPress installation, please follow below given instructions to set up your mobile application..
4.1) – Getting Started
Download and install all latest tools, required for developing Android apps such as Java Development Kit and Android Studio as the Official Android IDE. For updated tutorial about how to install them, you can see and Download this from Android Developer website.
Download JDK
Download Android studio IDE
4.2) – Android Studio Setting
There are three main things interacting when you use Android Studio to create android applications.
· The code you write in Java or Kotlin to create interactive android apps
· Android Studio itself, an IDE that provides you with a nice interface for coding
· Android SDK, a selection of tools including the Android platform itself
Now you can click on Android Studio to launch it. Once it opens up, you’ll be presented with a menu where you’ll be able to get started or configure some options. The great thing is that everything is handled for you at this point, though you may want to familiarize yourself with the SDK Manager (Configure > SDK Manager) which is where you’ll update your Android SDK to support newer versions, as well as download things like code samples or support for Google Glass. But don’t worry about that now but if Android Studio says you’re missing something, this is where you’ll probably need to go to find it.
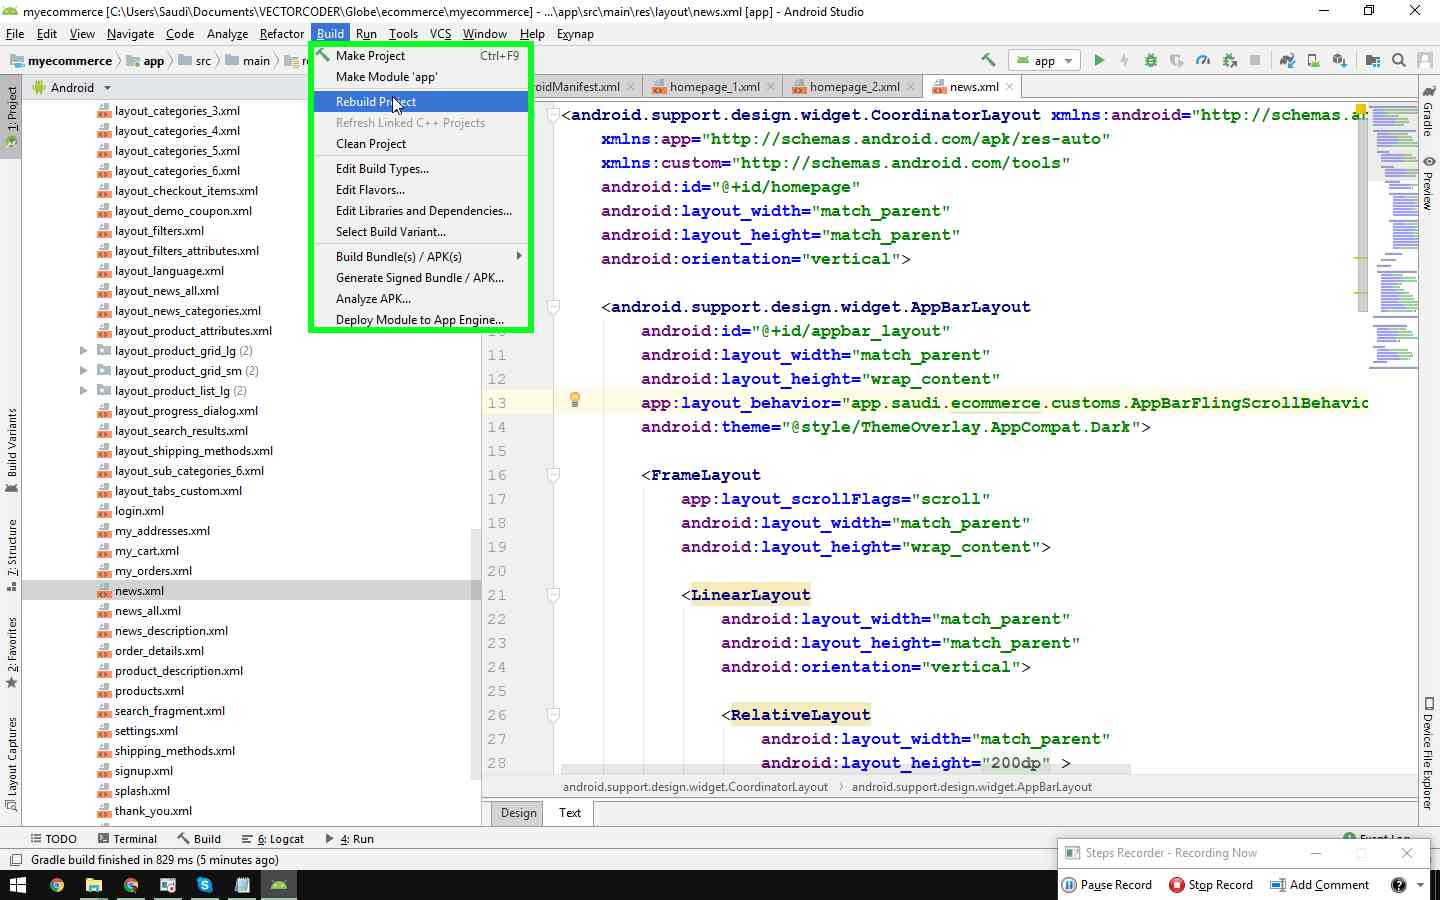
4.3) – Import Project in Android Studio
Locate your Android app in the given project zip folder
· Open Android Studio > Import Project (Eclipse ADT, Gradle, etc.)
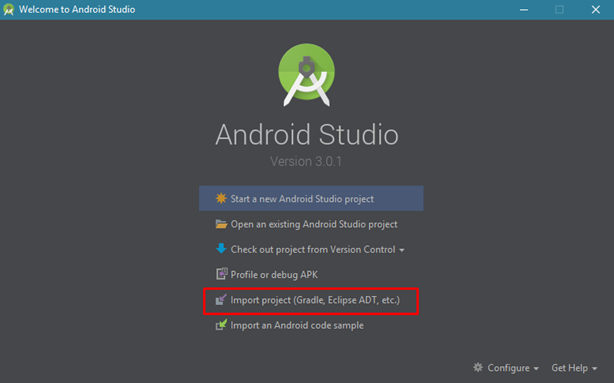
· Browse to directory where you placed “AndroidWocommerce” project and click OK.

While importing your android app you may get some dependencies errors. to resolve that you just need to update versions of build tools.

After successful build you will get a screen like this.

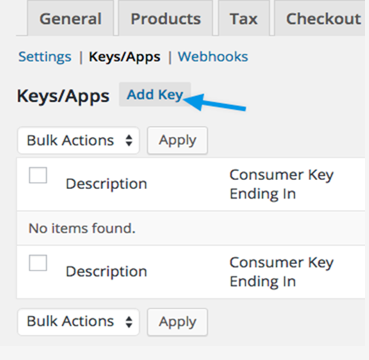
Enable REST API & Generate API Keys
To enable REST API within WooCommerce go to WooCommerce > Settings > API and tick the Enable REST API checkbox.

The WooCommerce REST API works on a key system to control access. These keus are linked to WordPress users on your website.
To create or manage keys for a specific WordPress user:
- Go to: WooCommerce > Settings > API > Keys/Apps.

- Select Add Key.
- Select the User you would like to generate a key for in the User field and add a Description
- Choose the level of access for this API key, which can be Read access, Write access or Read/Write access.
- Select the Generate API Key button, and WooCommerce will generate API keys for that user.
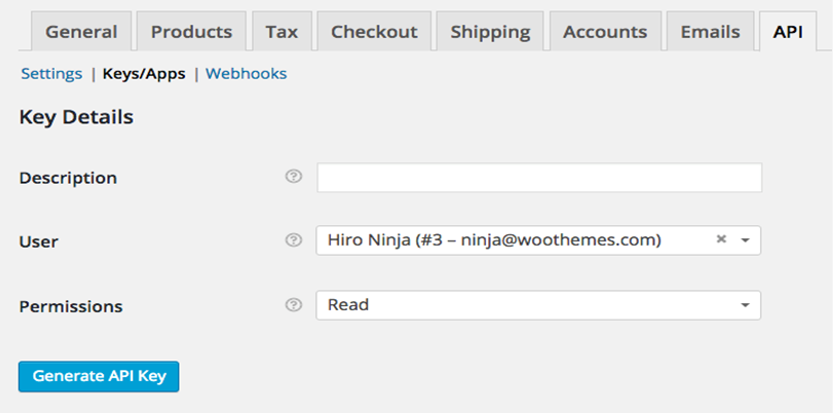
- Now that keys have been generated, you should see now keys, QRCode, and a Revoke API Key button. These two keys are your Consumer Key and Consumer Secret.

- Place your site link, consumer key and consumer secret in the mobile application app > java > yourpackagename > constant > ConstantValues.java
Change Server URL in Application
Select app > java > yourpackagename > constant > ConstantValues.java

I don’t want to use AdMob.
If you not want to use AdMob Just delete a number of lines from your code. Just follow the steps.
Step one:Open strings.xml file and remove this line.
“<!–AddMod AppID–><string name=”addmob_AppID” translatable=”false”>Your_AdMob id </string>”
Step two: Goto your manifest file and find this line and remove it.
“<meta-data android:name=”com.google.android.gms.ads.APPLICATION_ID” android:value=”@string/addmob_AppID”/>
”
Step three:Open ConstantValues.java file and find these lines and
then hold ctrl button on your keyboard and check where using these strings.
“public static boolean IS_ADMOBE_ENABLED;
public static String ADMOBE_ID;
public static String AD_UNIT_ID_BANNER;
public static String AD_UNIT_ID_INTERSTITIAL;”
Step Four: IS_ADMOBE_ENABLED uses in fourteen classes just go and remove the code where uses.
Name of classes:
1. About.java
2. Category_2.java
3. Category_3.java
4. HomePage_5.java
5. Language.java
6. My_Orders.java
7. News.java
8. SearchFragment.java
9. SettingFragment.java
10. Shiping_Methods.java
11. SignUp.java
12. SplashScreen.java
13. SplashScreen.java
14. Thank_you.java

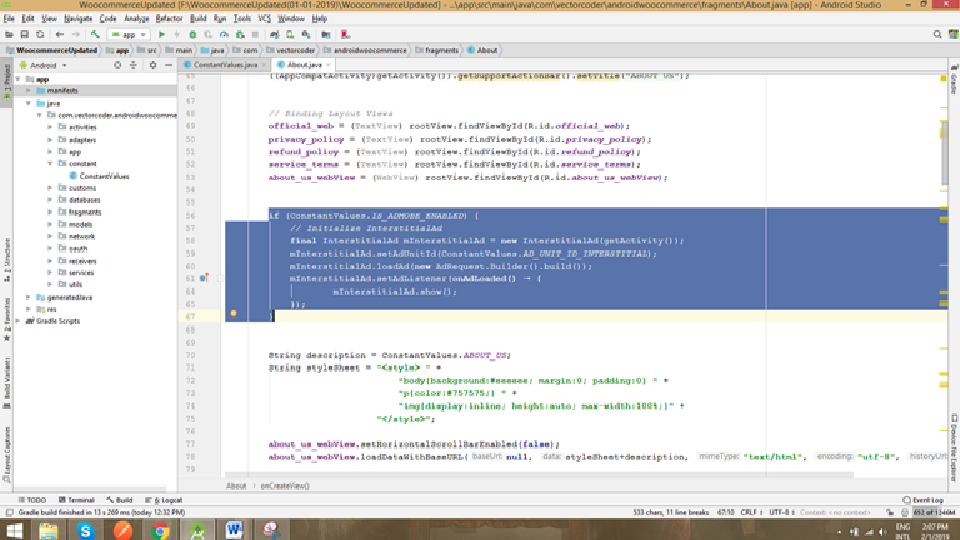
Go one by one all the classes and remove the code. For example when you click About .java class this will take you go this code and just remove them
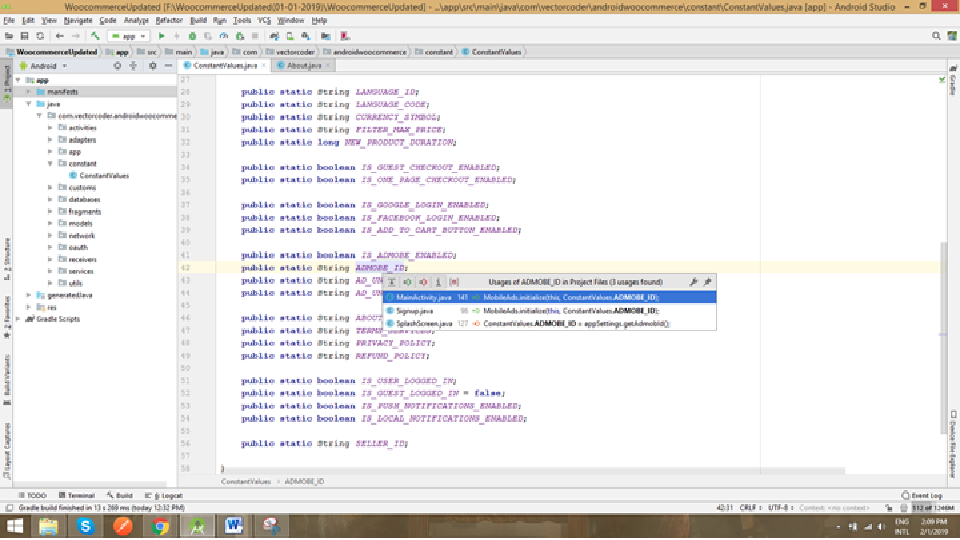
Step Five: ADMOB_ID uses in three classes just go and remove the code where uses.
Name of classes:
⦁ MainActivity.java
⦁ Signup.java
⦁ SplashScreen.java
Step Six: Delete the uses of AD_UNIT_ID_BANNER from your code. AD_UNIT_ID_BANNER this is use in these classes and also shows in screen shots.
⦁ Language.java
⦁ My_Orders.java
⦁ News.java
⦁ SearchFragment.java
⦁ Signup.java
⦁ SplashScreen.java
⦁ Thank_You.java

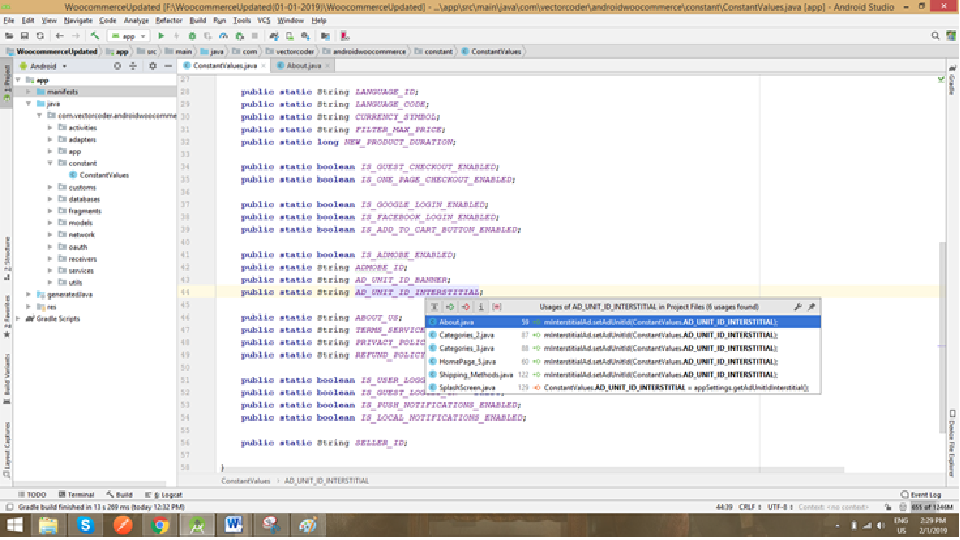
Step Seven: Delete the uses of AD_UNIT_ID_INTERSTITIAL from your code. AD_UNIT_ID_INTERSTITIAL this is use in these classes and also shows in screen shots.
⦁ About.java
⦁ Categories_2.java
⦁ Categories_3.java
⦁ HomePage_5.java
⦁ Shiping_Methods.java
⦁ Splash_Screen.java
I hope after following these steps your App run perfectly. Thank You
Facebook Integration
https://developers.facebook.com/quickstarts/?platform=android
This link will take you to the Facebook Developer Console. After login with your Facebook account you will get a screen like this.
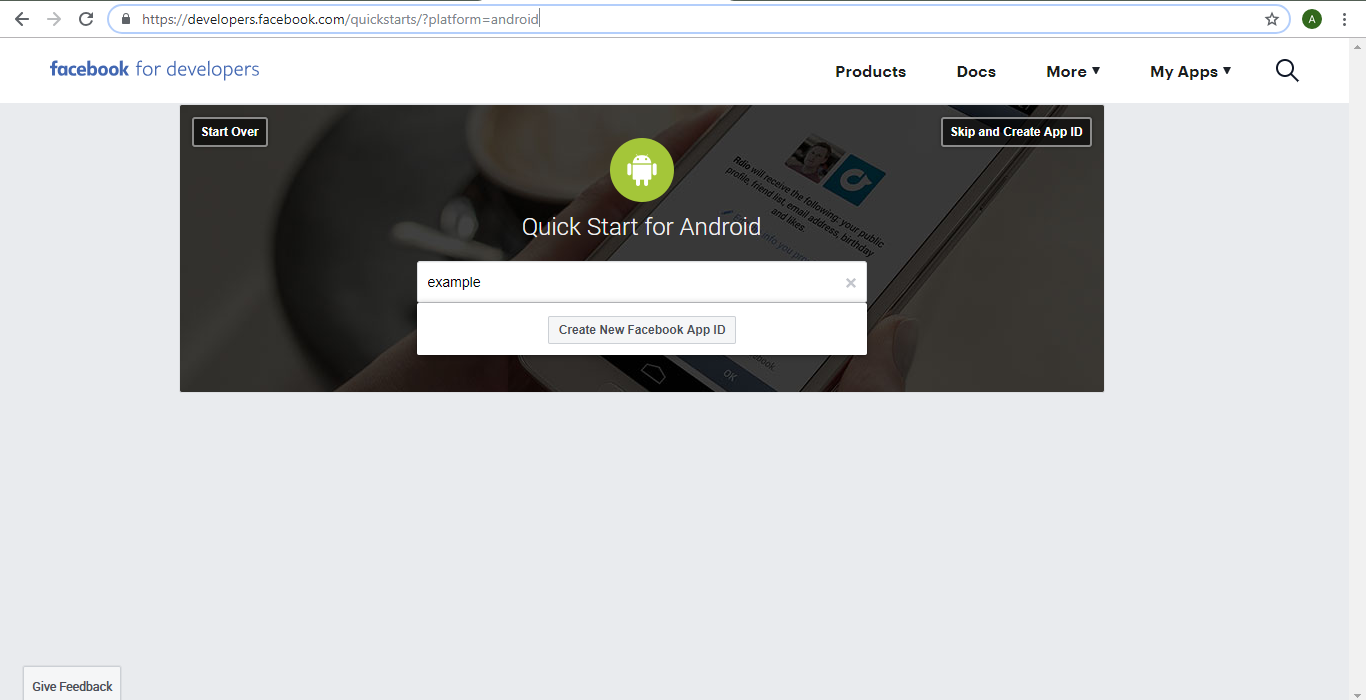
Enter your project name into the Edit Text Field and click Create New Facebook App ID. You will get a screen like this.
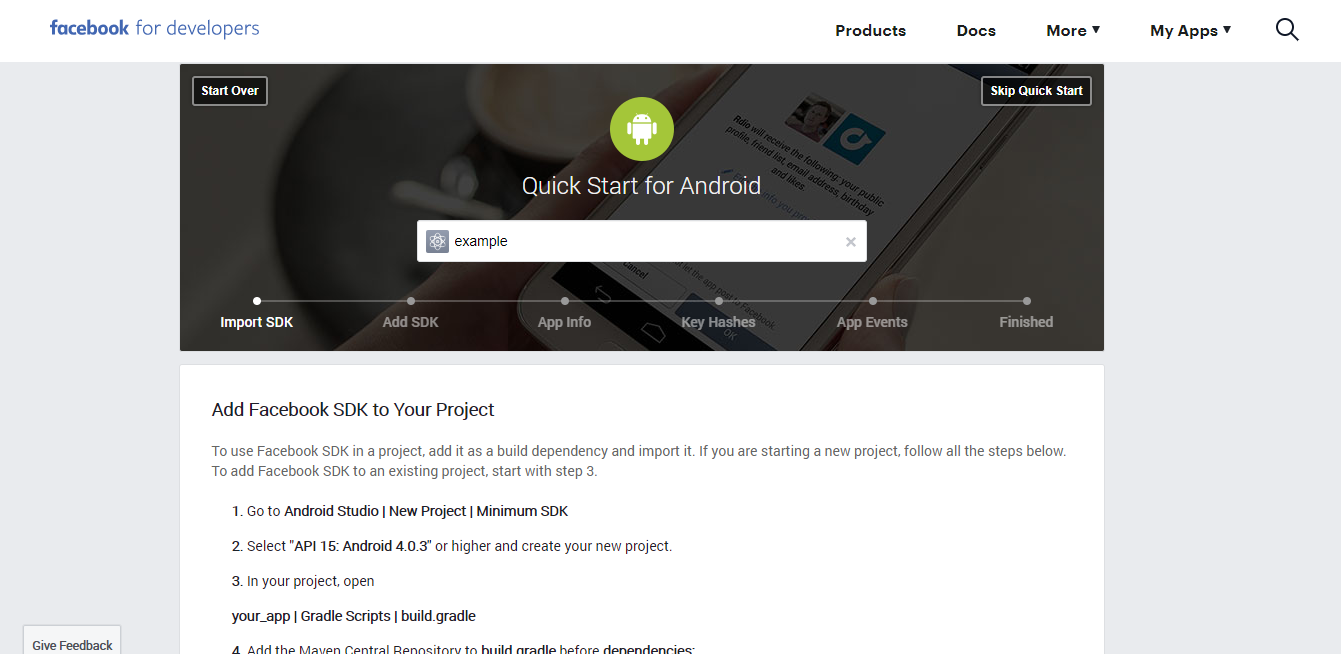
Skip that Import SDK Step and jump to Add SDK and copy that Facebook app ID and keep it safe.
In the Next step paste that application id and (application id)+.activities.SplashScreen and click Next.

In the next step you need to generate a key hash. keep in mind there are two methods for generating the developmental key hash and release key hash.
In order to generate the key hash first you need to download the OpenSSL tool. To download that for windows go to this link below.
https://code.google.com/archive/p/openssl-for-windows/downloads
Download OpenSSL tool compatible with your system and extract it to C:\OpenSSL.
Next you need to find the path of debug.keystore file in the C drive. usually it is placed in the C:\Users\YOUR_NAME\.android folder.
Now open the Command Prompt. and execute the following command.
For Debugging (use it for development purpose only.)
Important:
keytool -exportcert -alias androiddebugkey -keystore “C:\Users\YOUR_NAME\.android\debug.keystore” | “C:\OpenSSL\bin\openssl” sha1 -binary |”C:\OpenSSL\bin\openssl” base64
For Publishing use this command
Important:
keytool -exportcert -alias “aliasName” -keystore “keystoreFilePath” | openssl sha1 -binary | openssl base64
Note:
remember to change the path to you debug.keystore file. and make it sure to use the OpenSSL folder name same as you created in the C drive.
when you press enter this will get a password. If you do not create a new password, then default password will be android
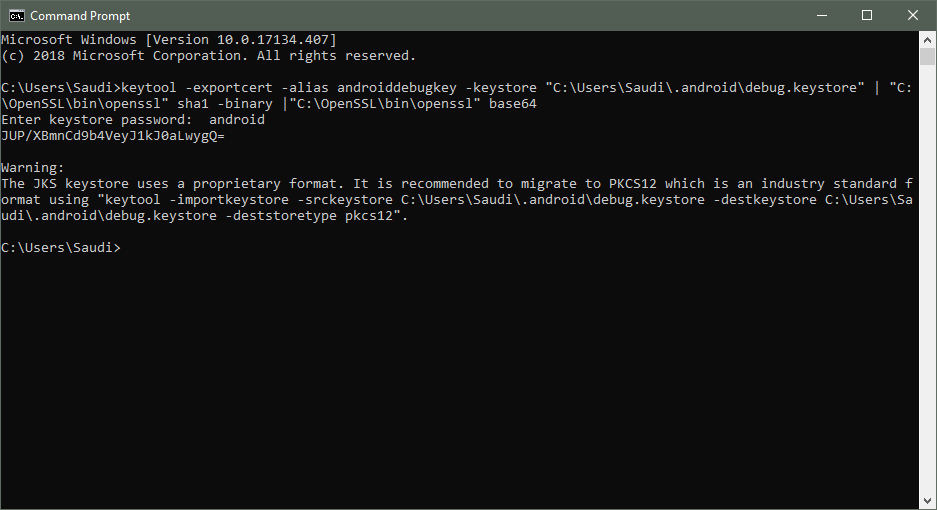
This is your key hash save it to your file and use it in developer Facebook console.
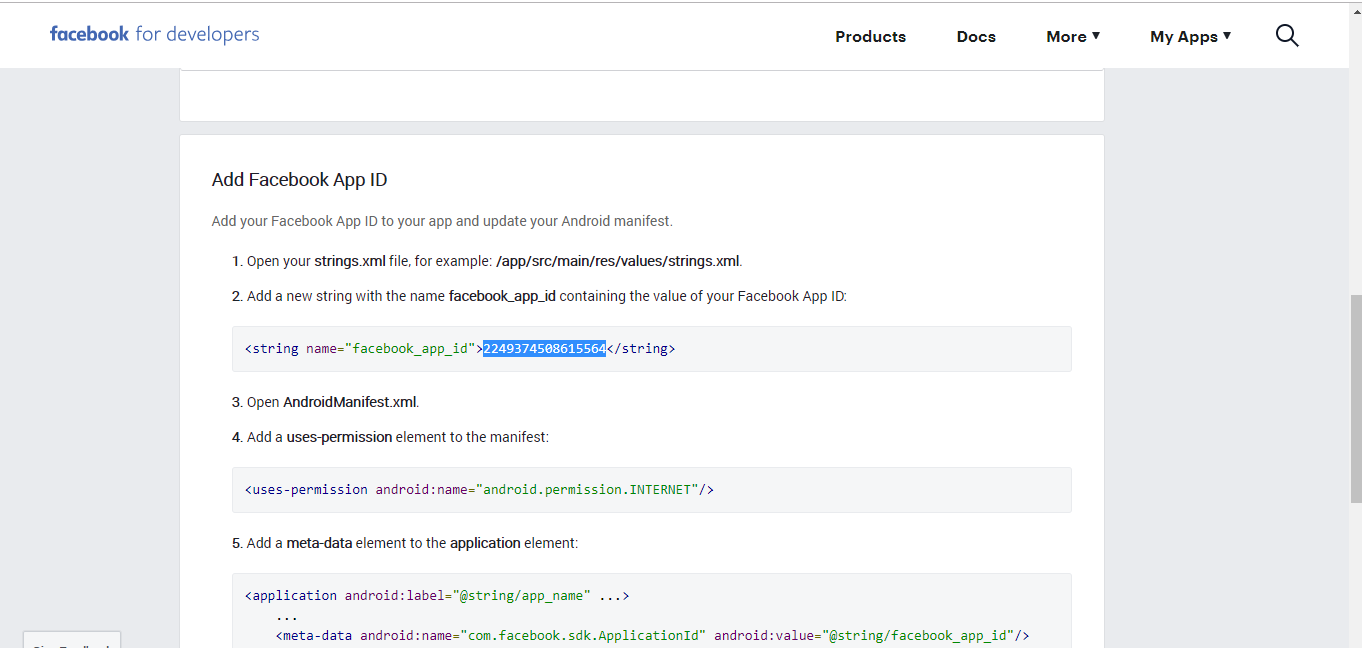
Now paste the application key to the android studio project file shown below. (res > values > strings.xml)

Admob Integration
https://www.google.com/admob/landing/sign-up-003.html
Go to the above link and sign in with your Google account.
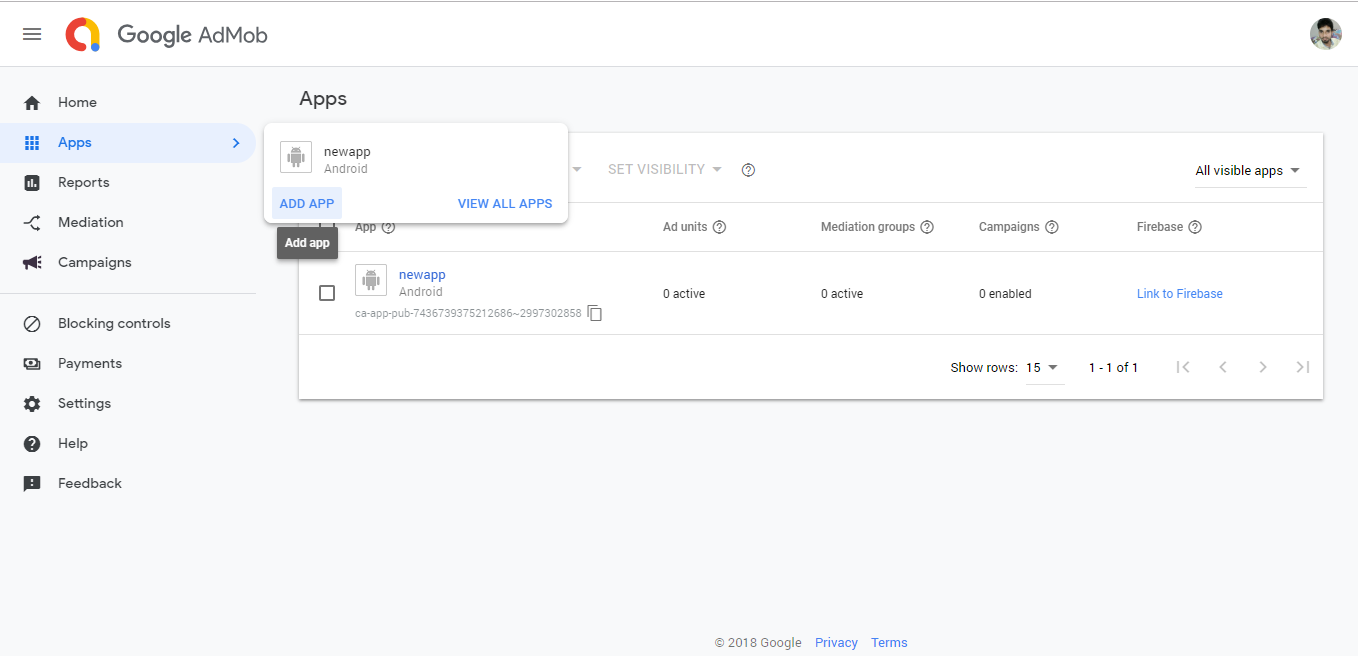
Now go to the Apps -> ADD APP as shown in the picture above.
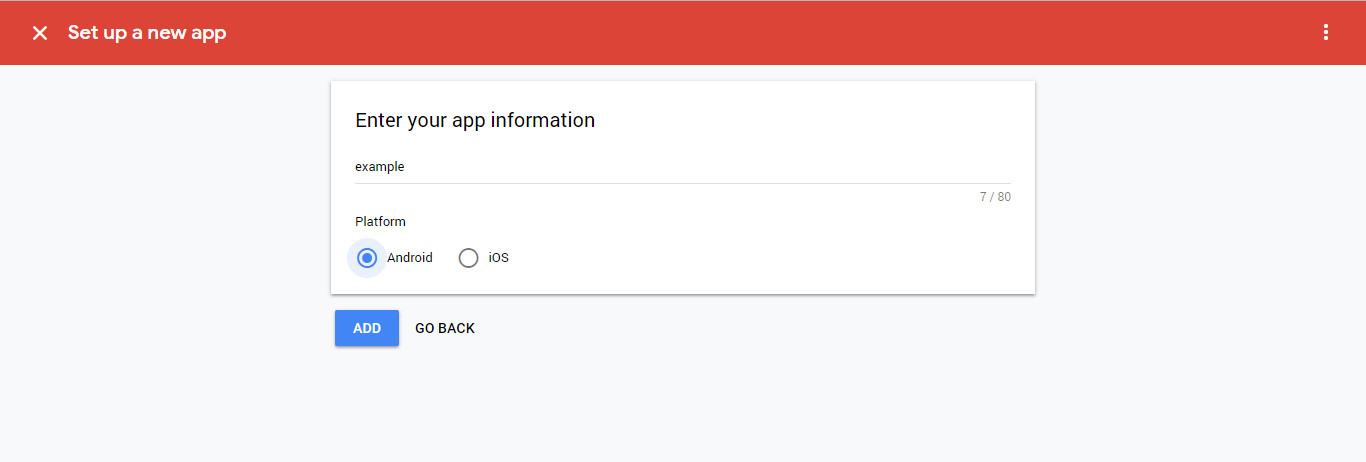
In the next step you will get the App Id. save it to your notepad.
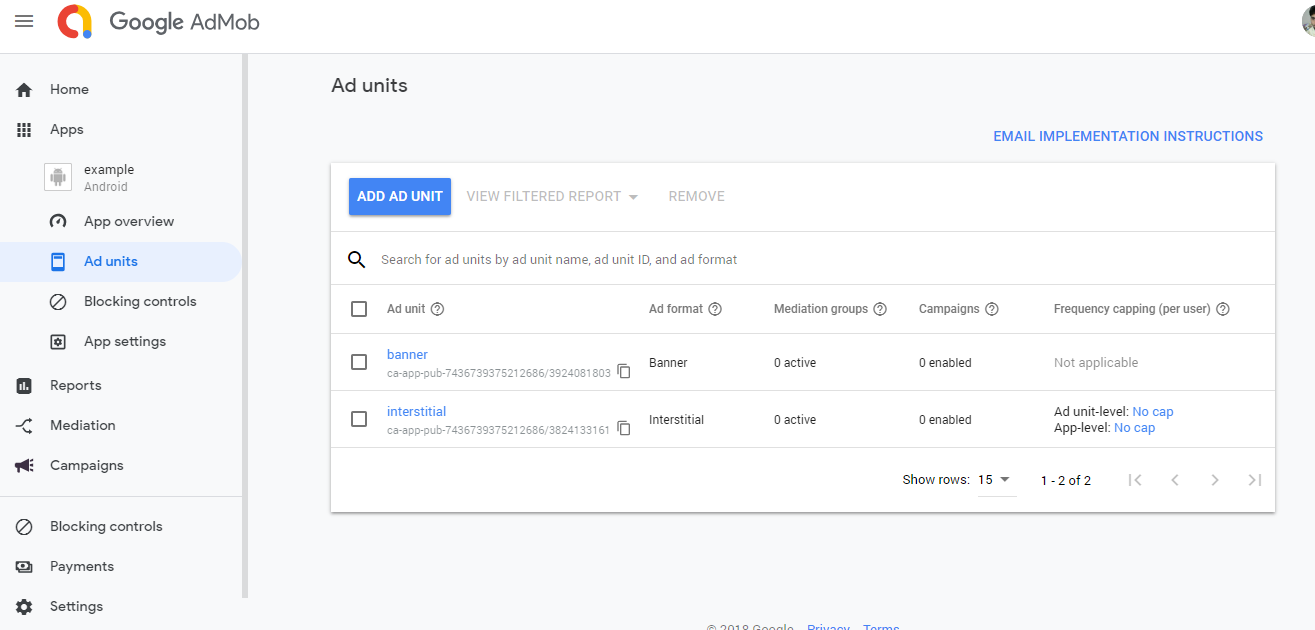
Then create a banner unit and Interstitial Unit and copy the add unity id for both, save it on your notepad.
Click below link to go to the Google admob documentation
https://developers.google.com/admob/android/quick-start
Or simply paste this code into the Application tag in manifest file.
Replace YOUR_APP_ID with your unique ID in the android tag.
<manifest>
<application>
<!– Sample AdMob App ID: ca-app-pub-3940256099942544~3347511713 –>
<meta-data
android:name=”com.google.android.gms.ads.APPLICATION_ID”
android:value=”YOUR_APP_ID”/>
</application>
</manifest>

Rename Package
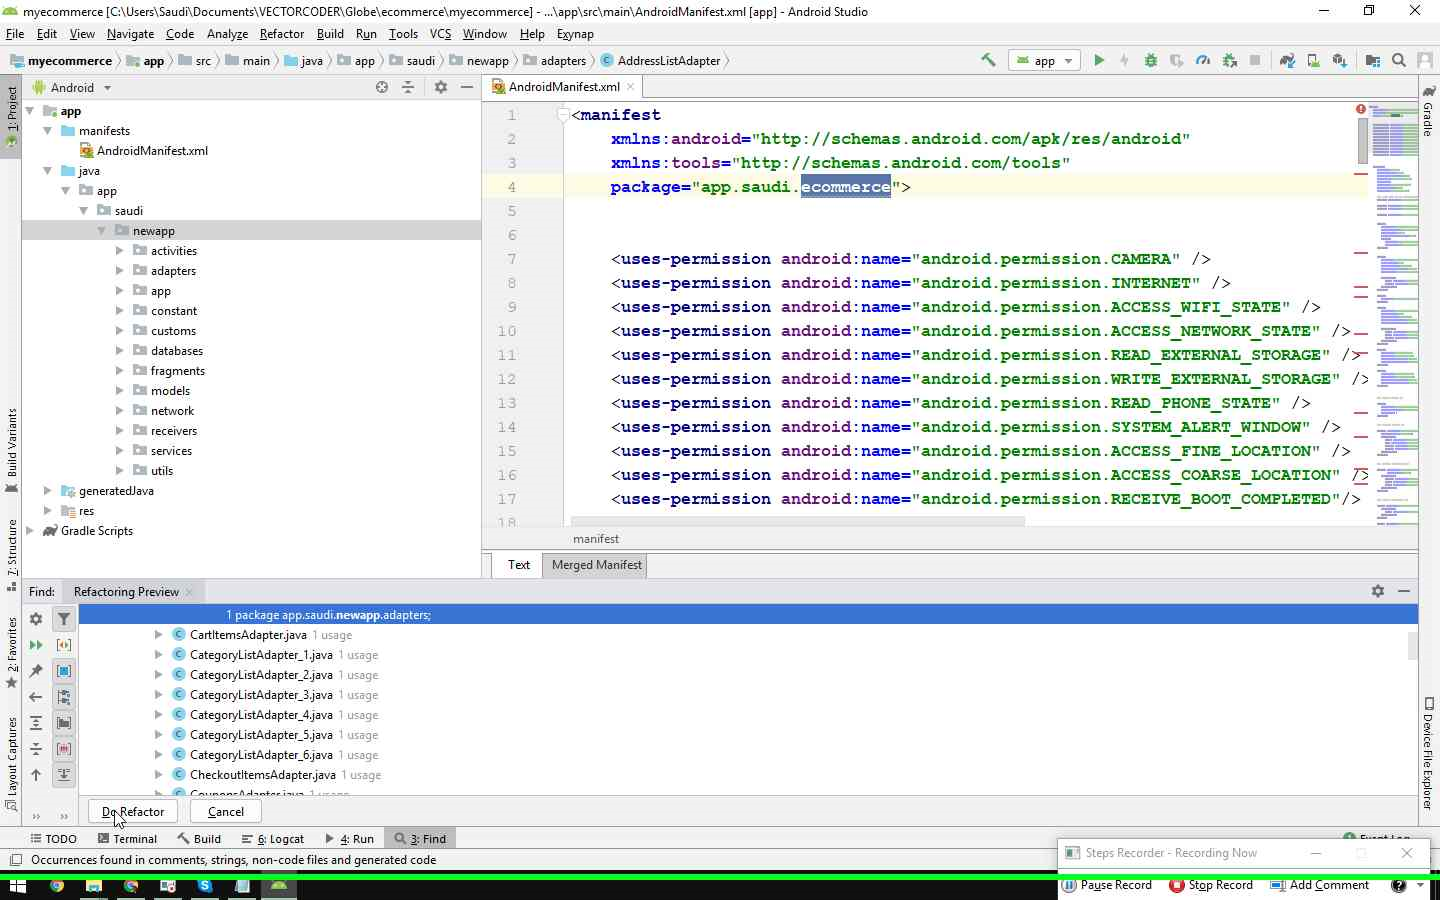
Lets Say you want to change the android app package name from com.saudi.something to the com.saudi.newapp. to do that follow the steps given below.
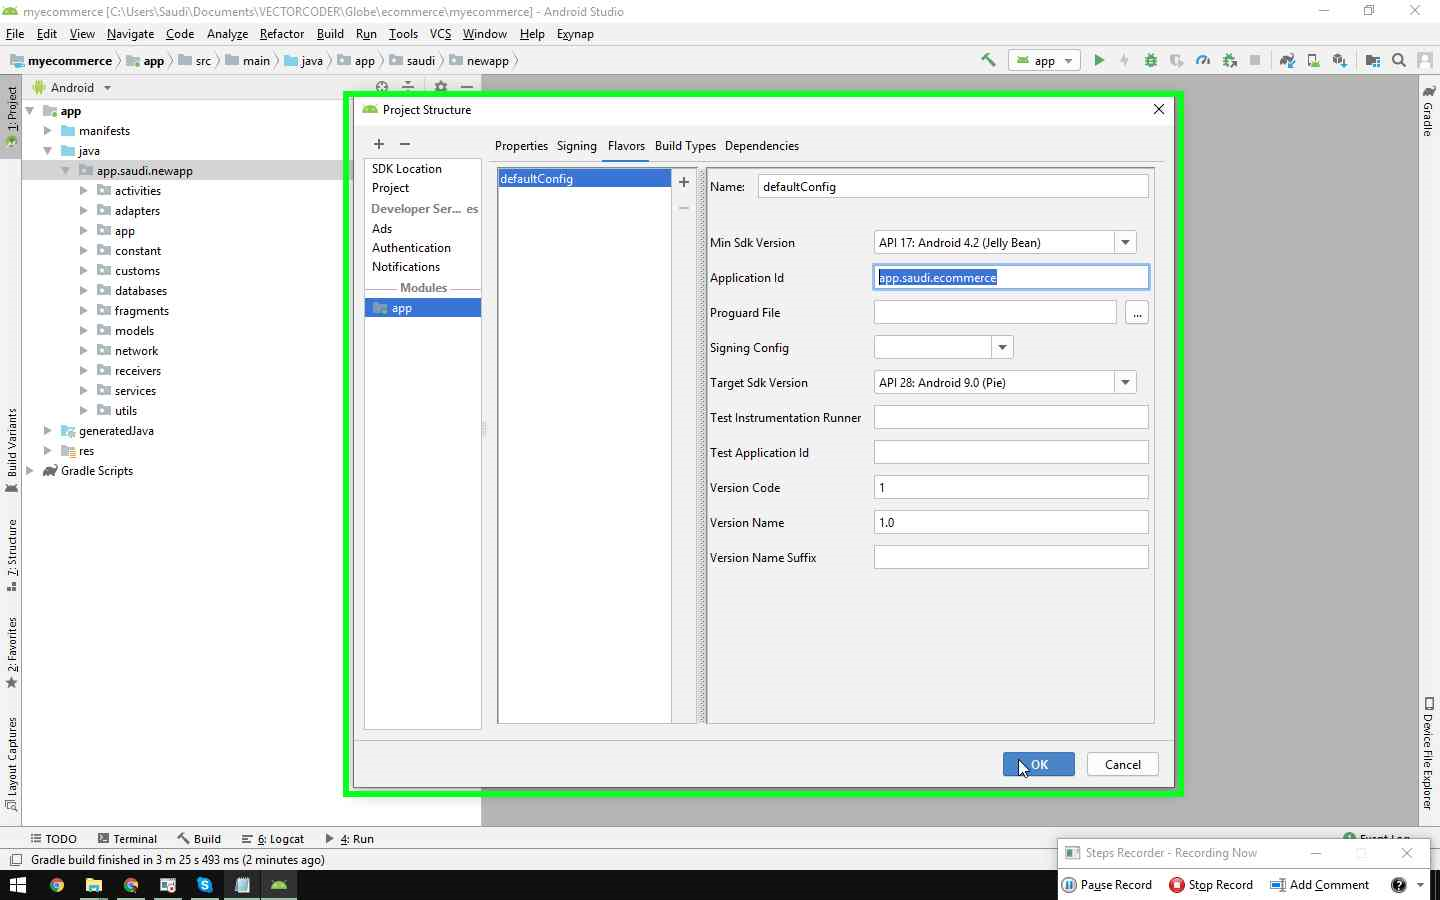
⦁ First open the Project Structure window in the android studio project by pressing CTR+ALT+SHIFT+S and under the app -> Flavour tab change the application id to the new application package name and hit OK
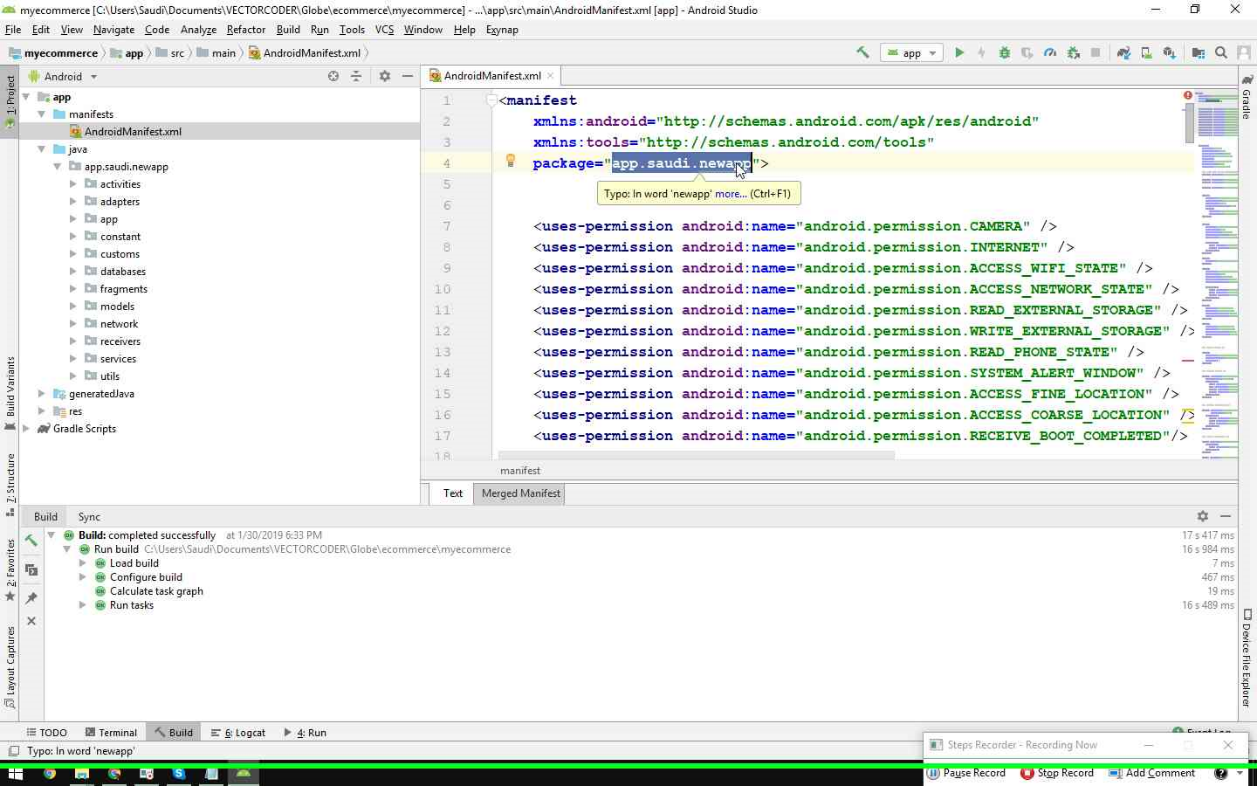
⦁ Next go to the AndroidMenifest.xml file and change the application package name to the new one.
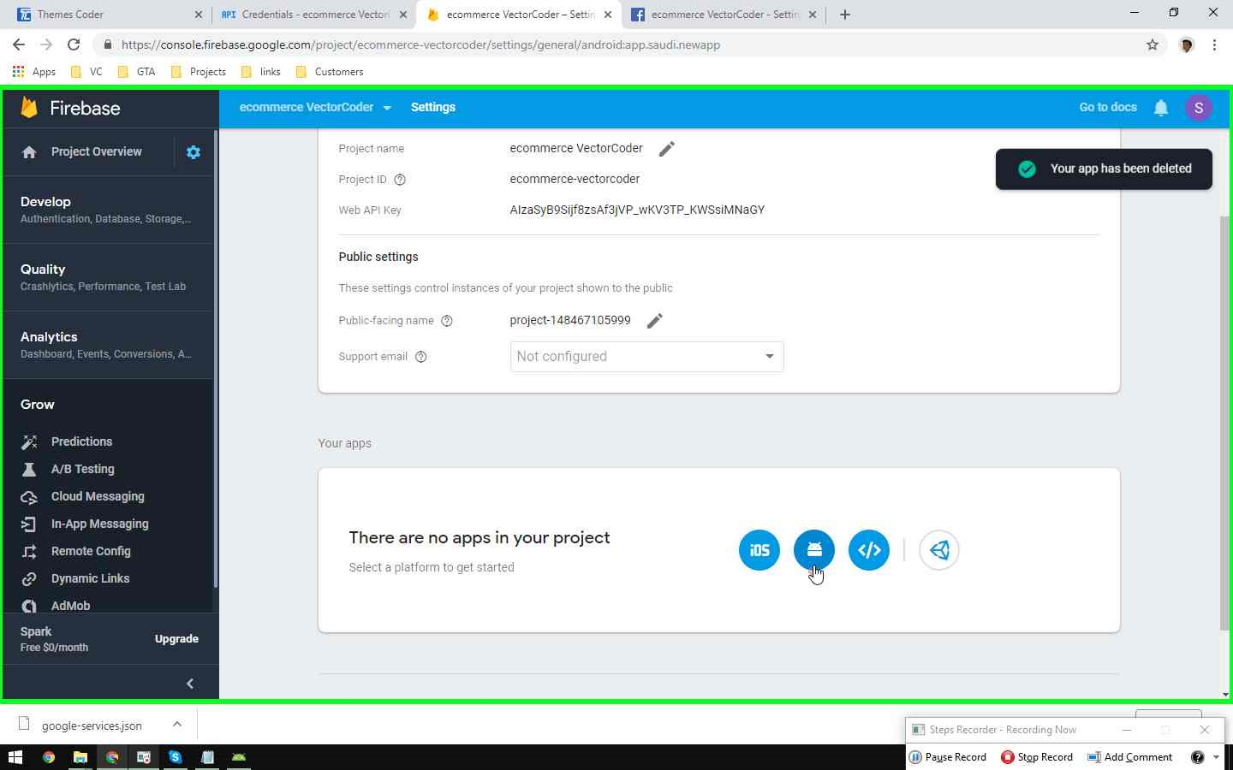
⦁ Next go to the Firebase Project and delete the previous app and create a new one with new android package name

⦁ to add new app to the Firebase Project click on android icon.
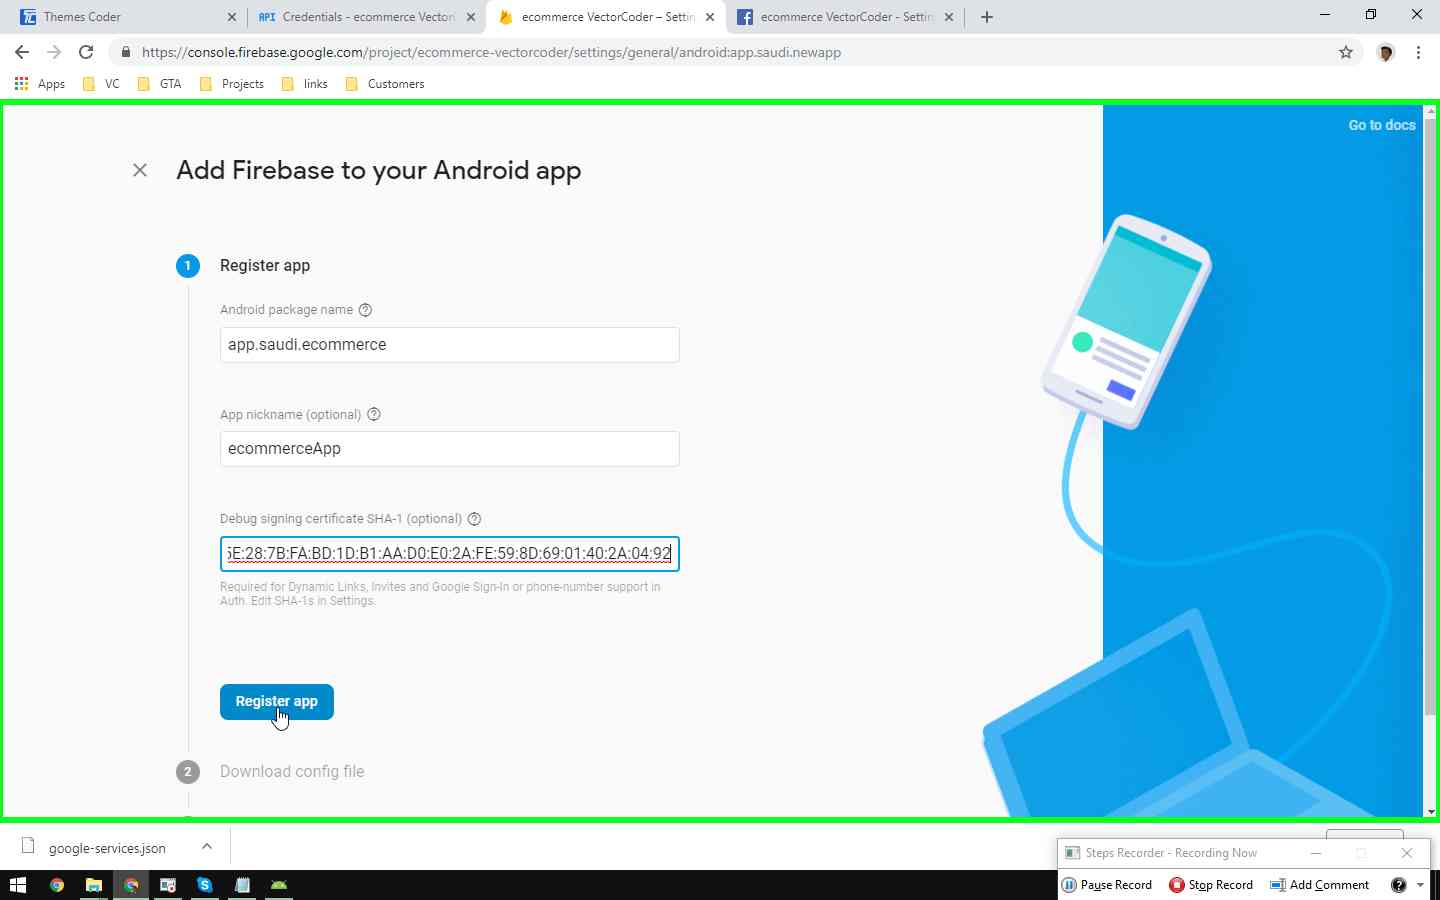
⦁ Next enter new credentials into the required fields.

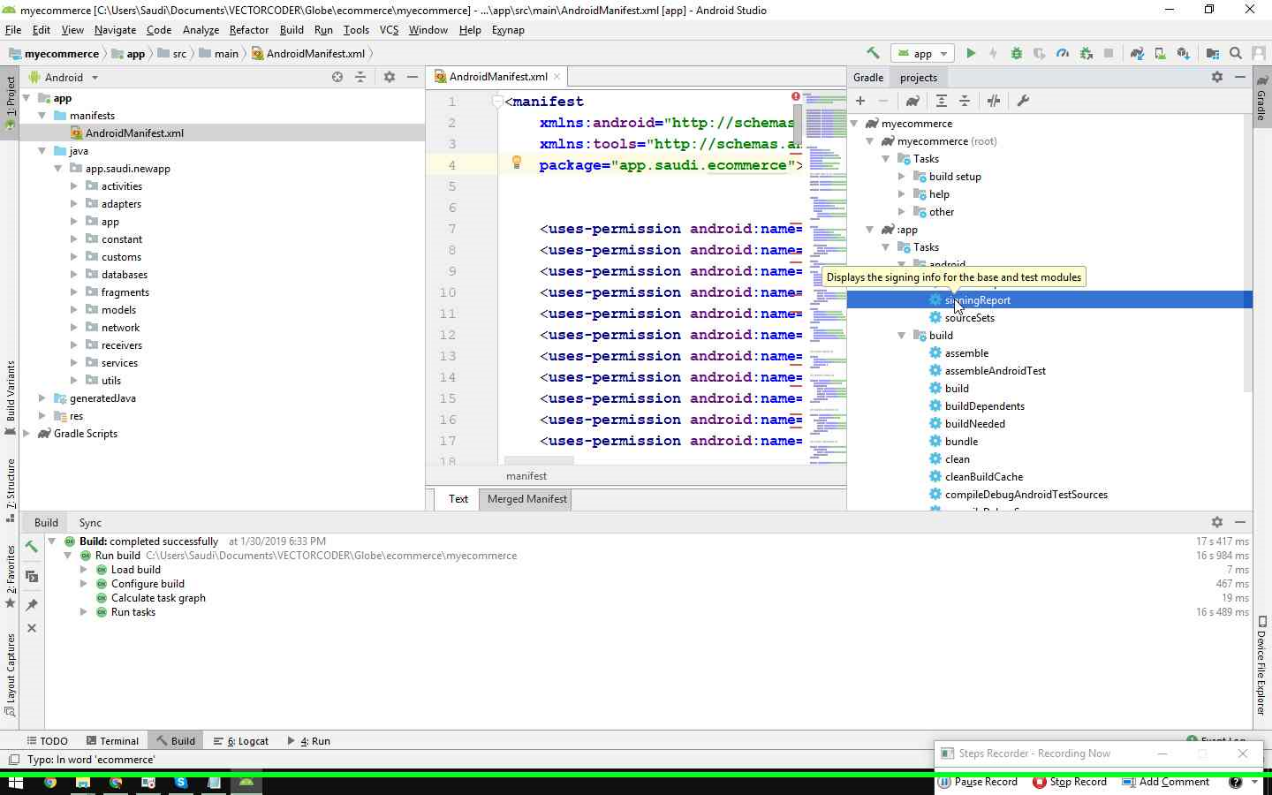
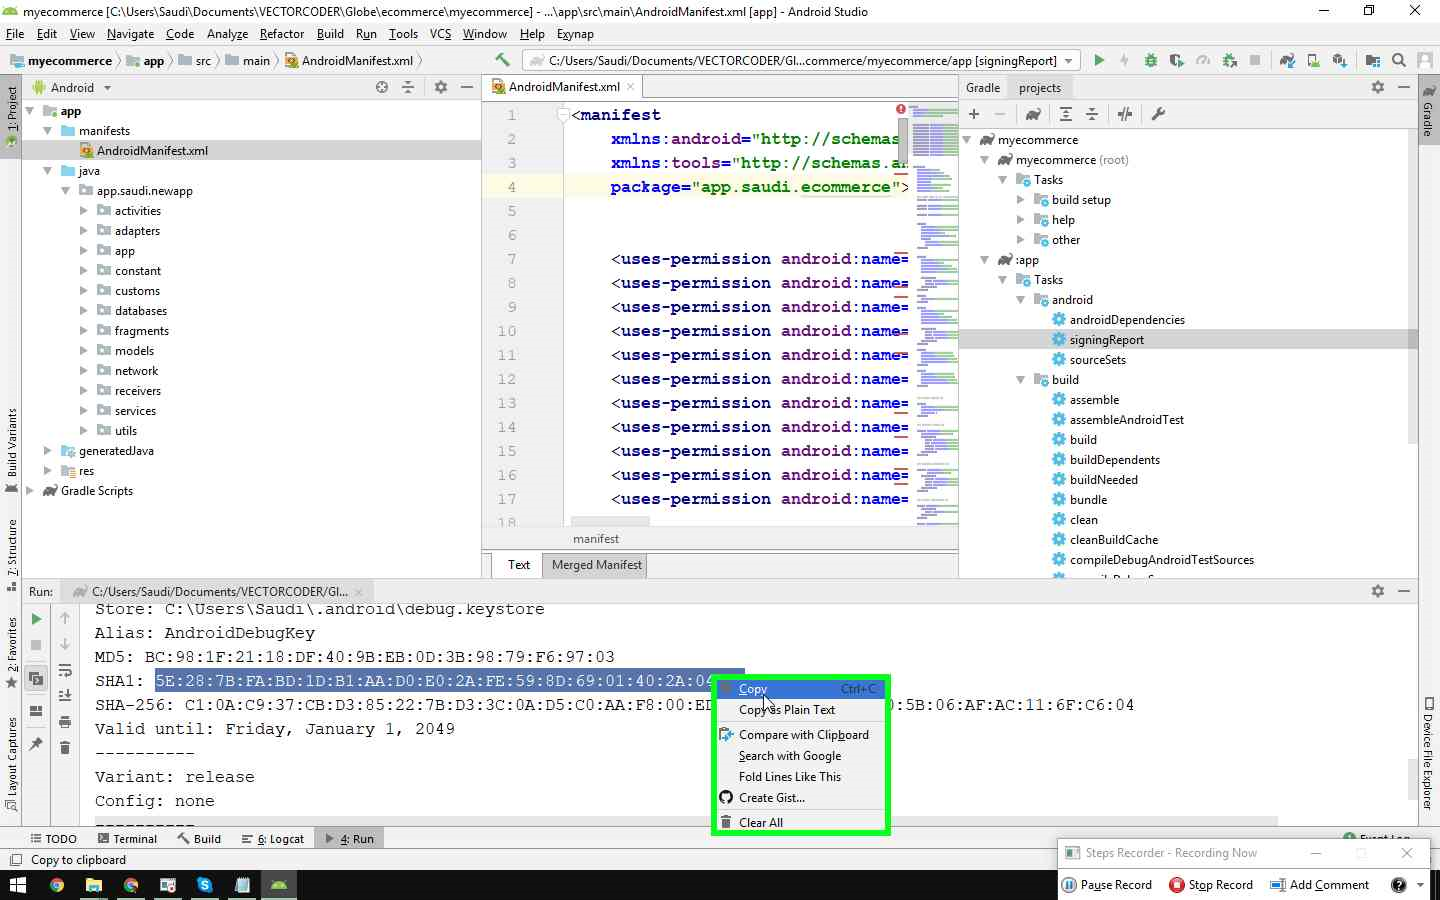
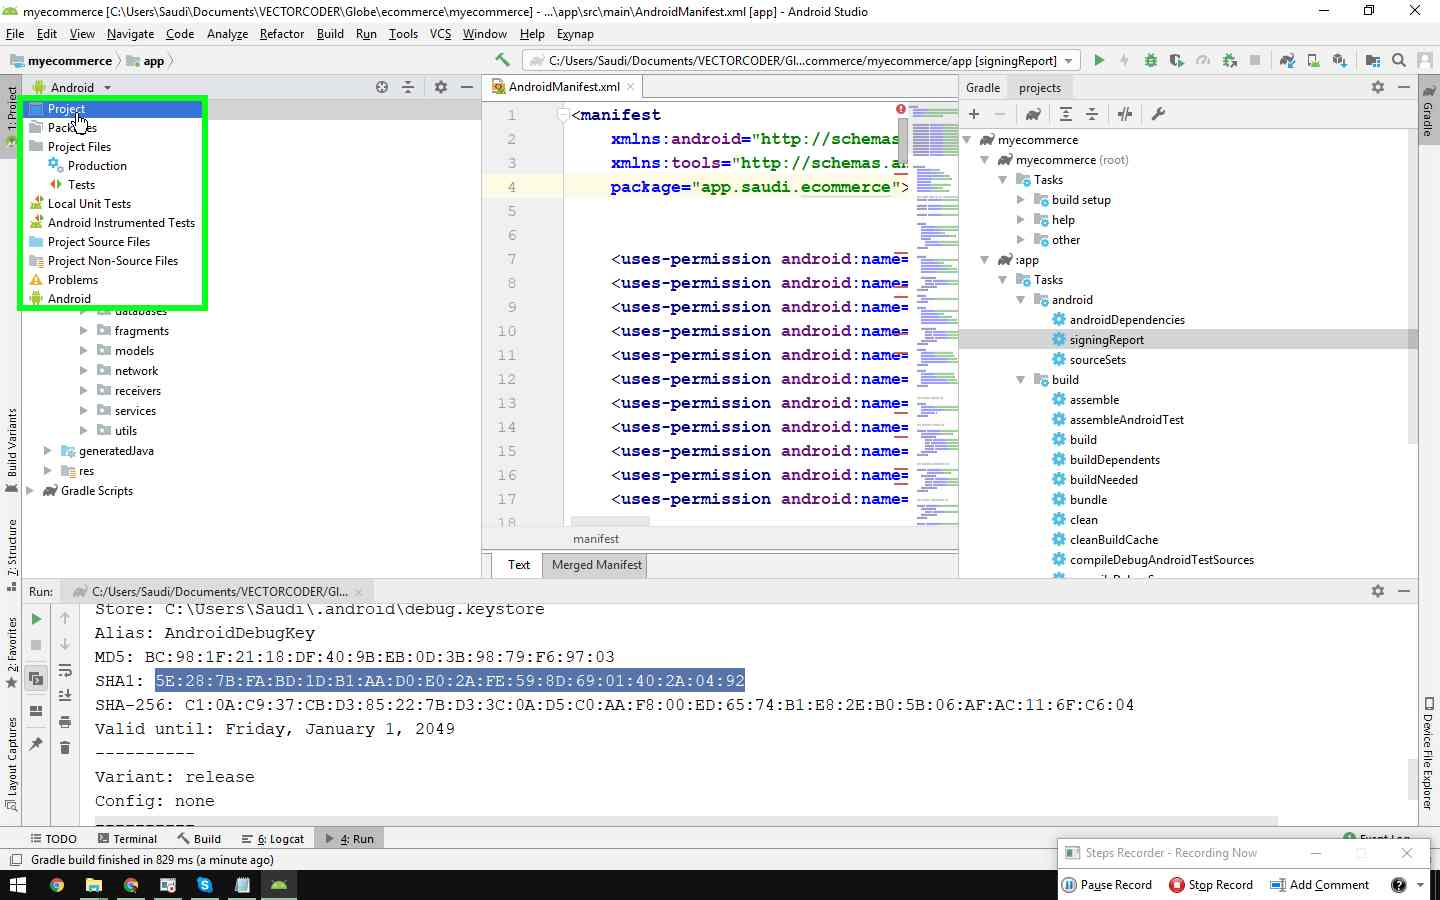
⦁ to get the new SHA-1 key execute a file shown in the image bellow by double click on it.
⦁ copy the SHA-1 key from here.
⦁ and paste it in the Firebase Project here. and hit Register App.
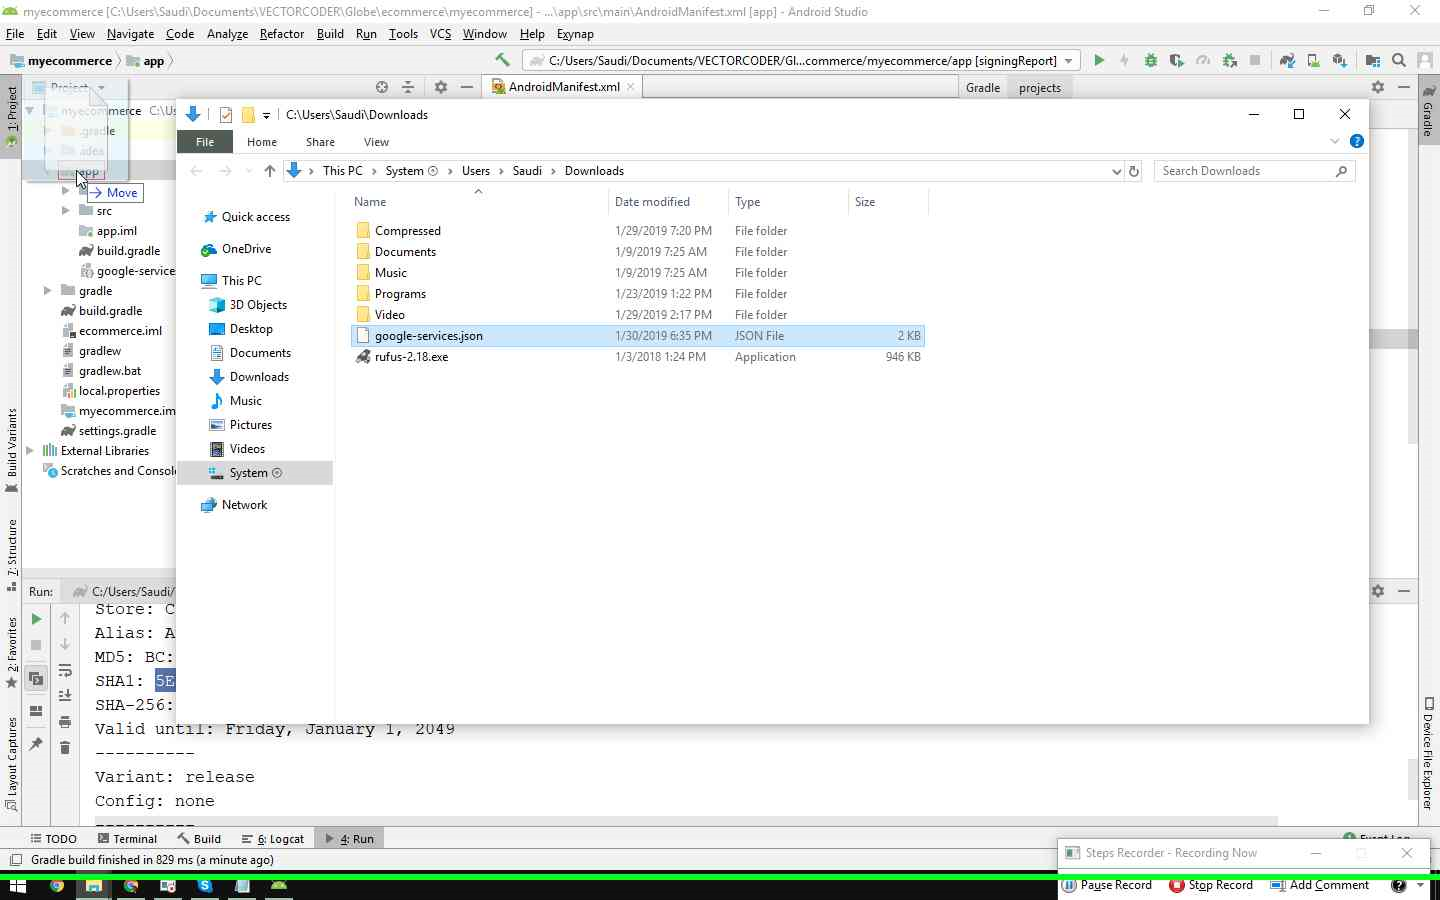
⦁ Next download the google-services.xml file from here.

⦁ next change the android studio project view to the project.
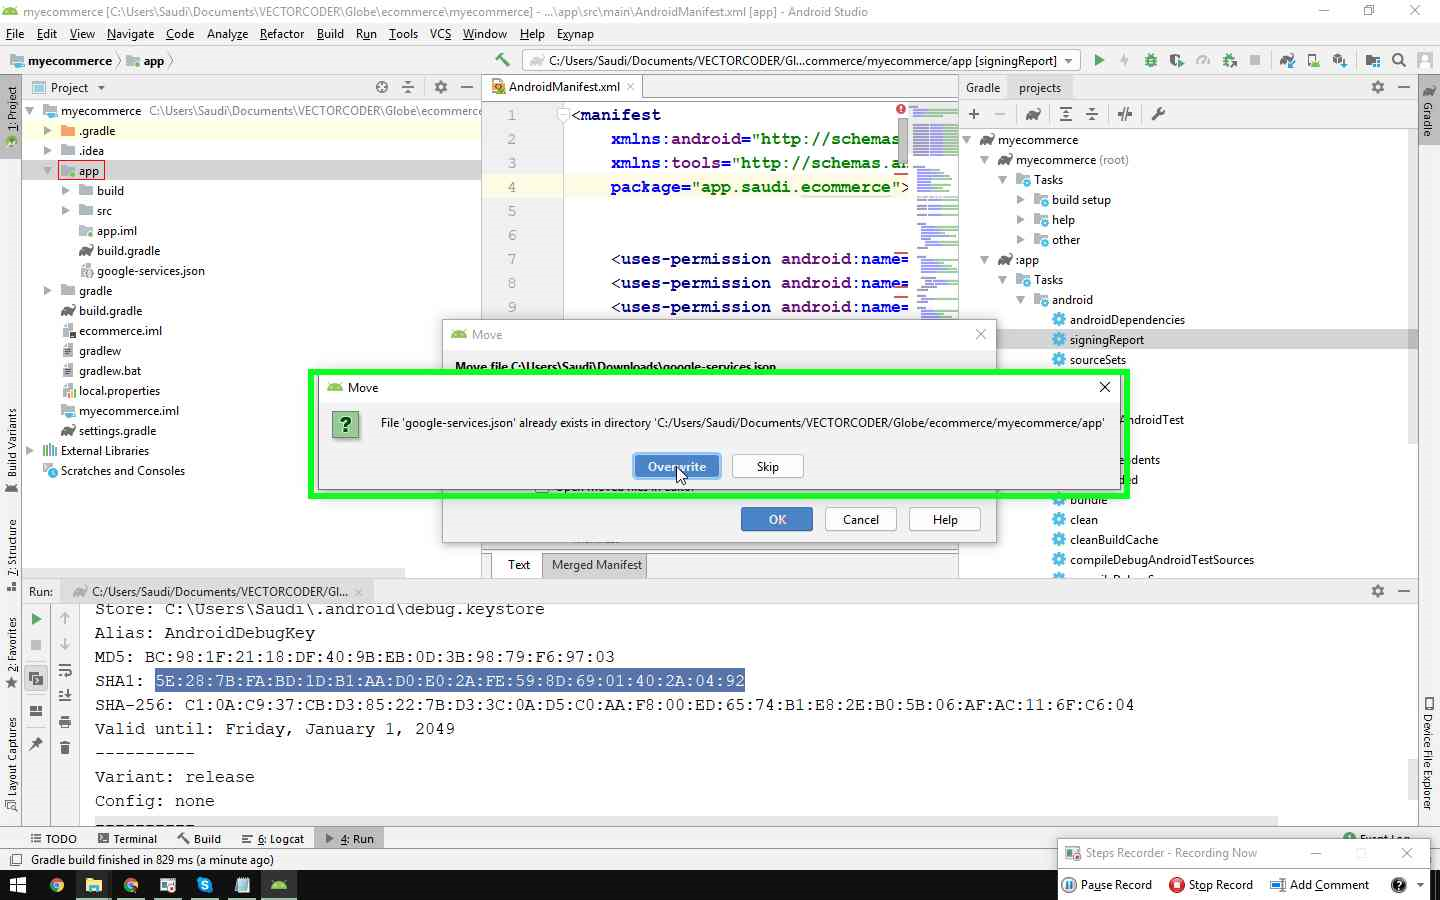
⦁ and move the downloaded google-services.xml file here in the app directory as shown in the image bellow.
⦁ hit Overwrite button.
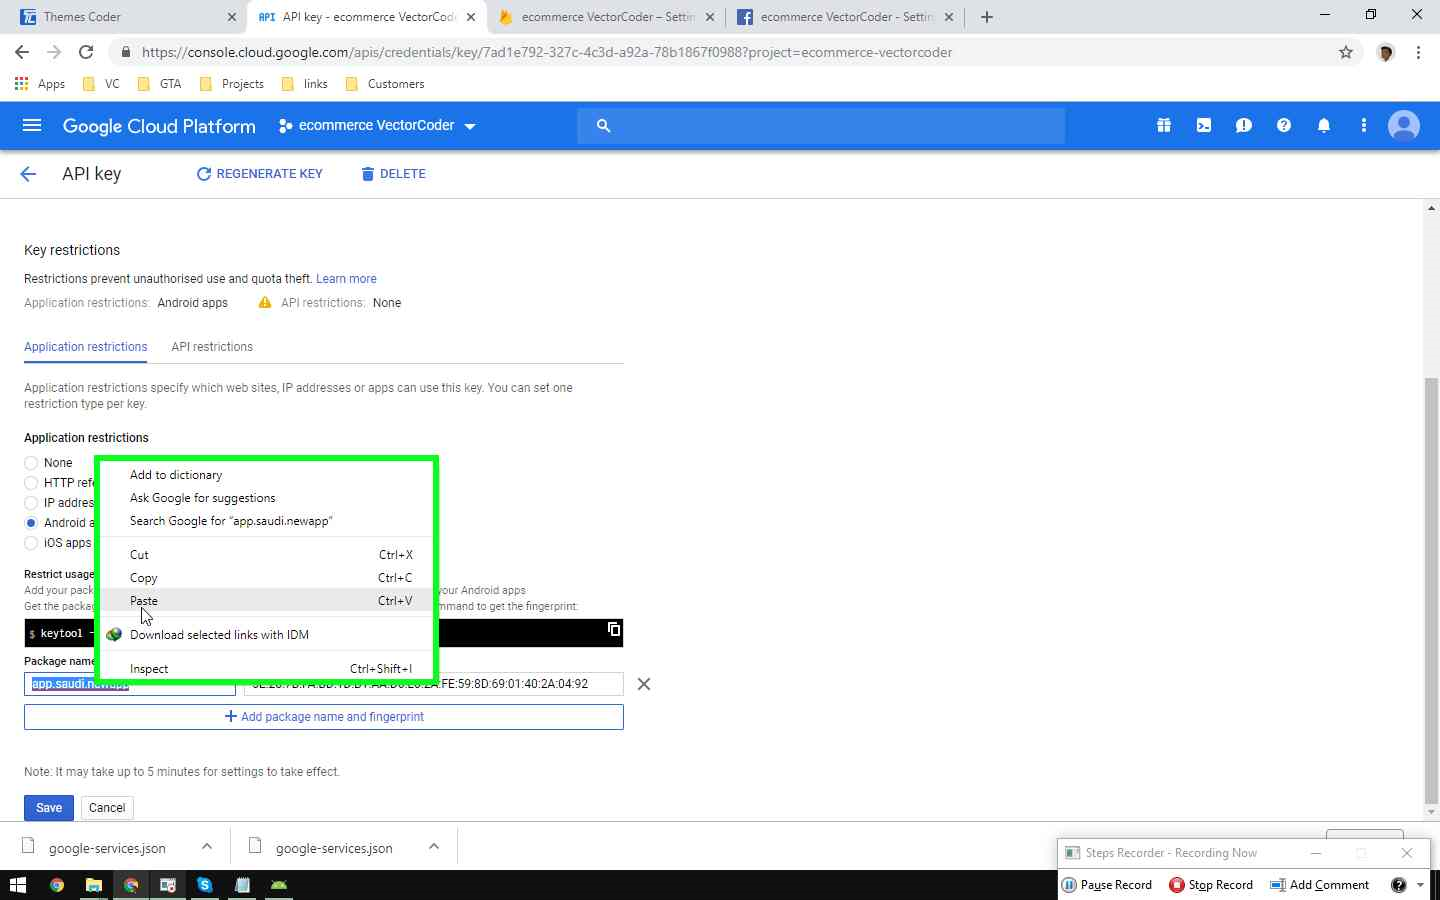
⦁ Next also change the package name in the google projects, google cloud platform to the new one.
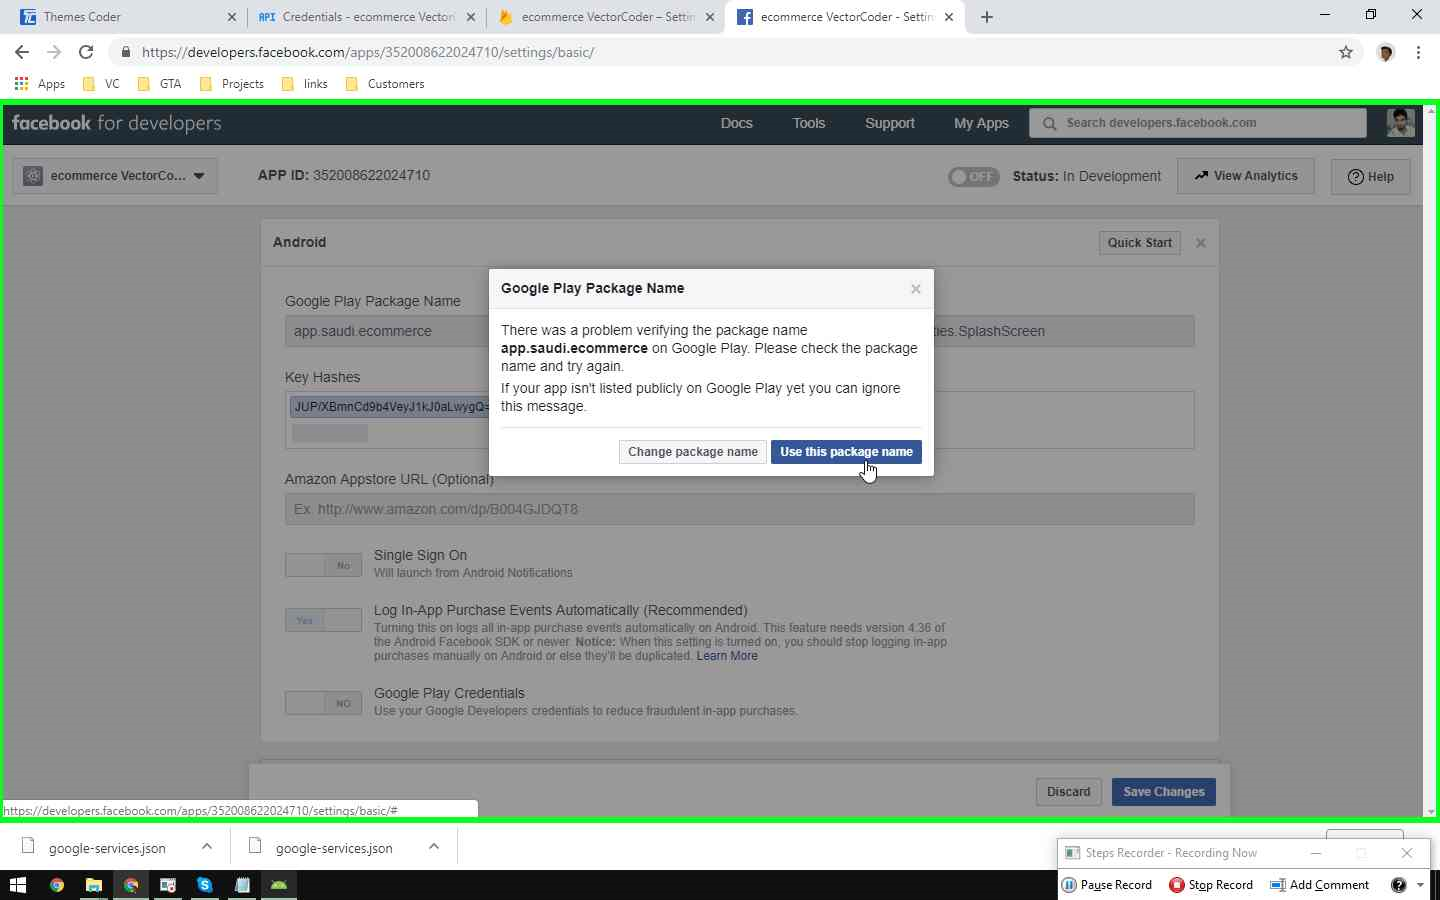
⦁ also in the developer.facebook.com under the settings -> basic settings – > change the application id and application secret to the new one
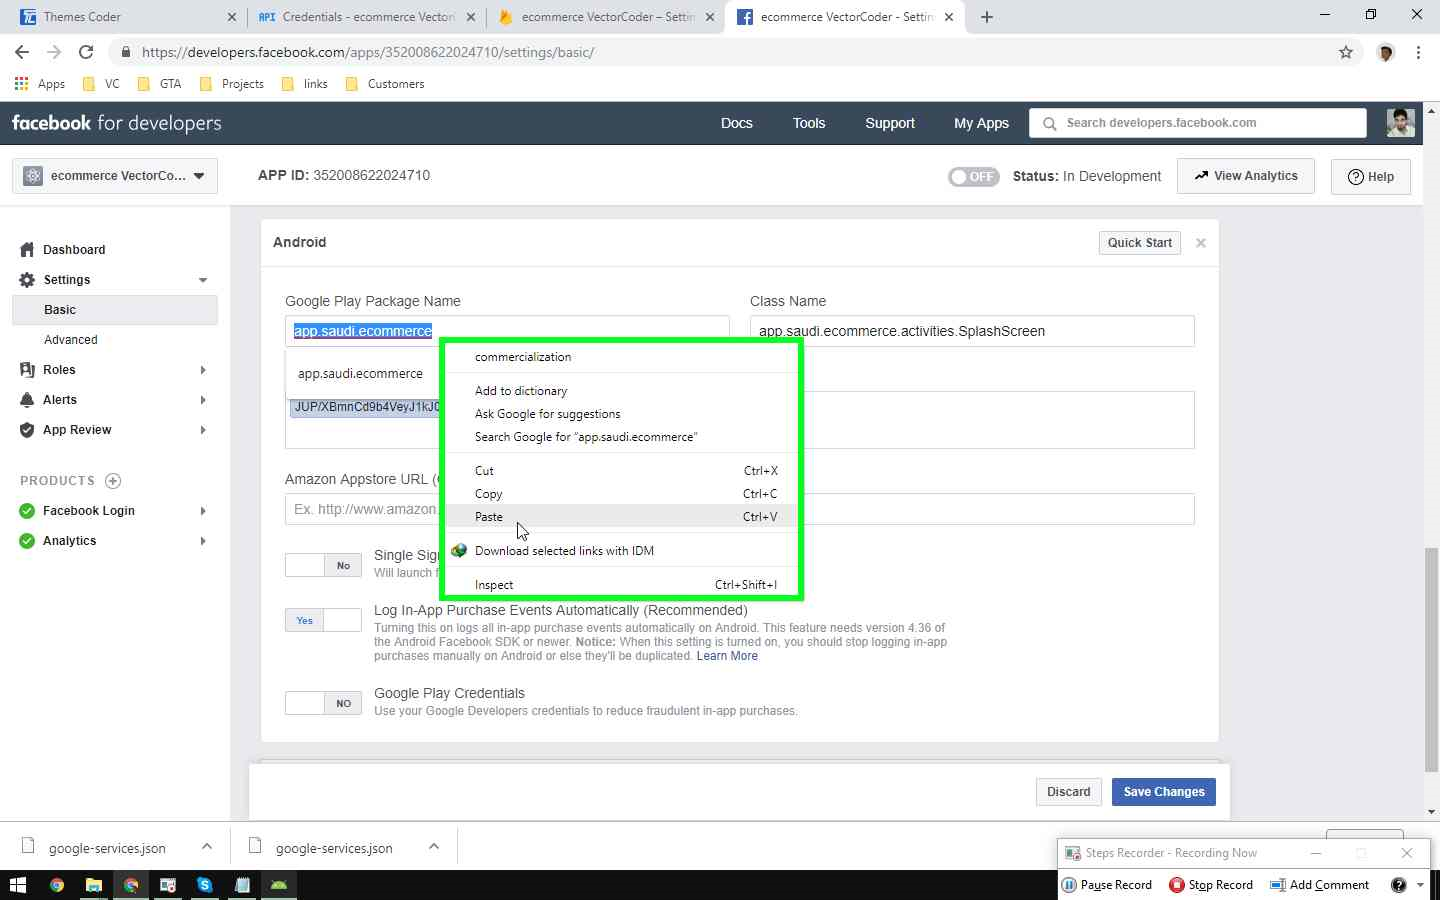
⦁ after changing it to new one hit save changes.
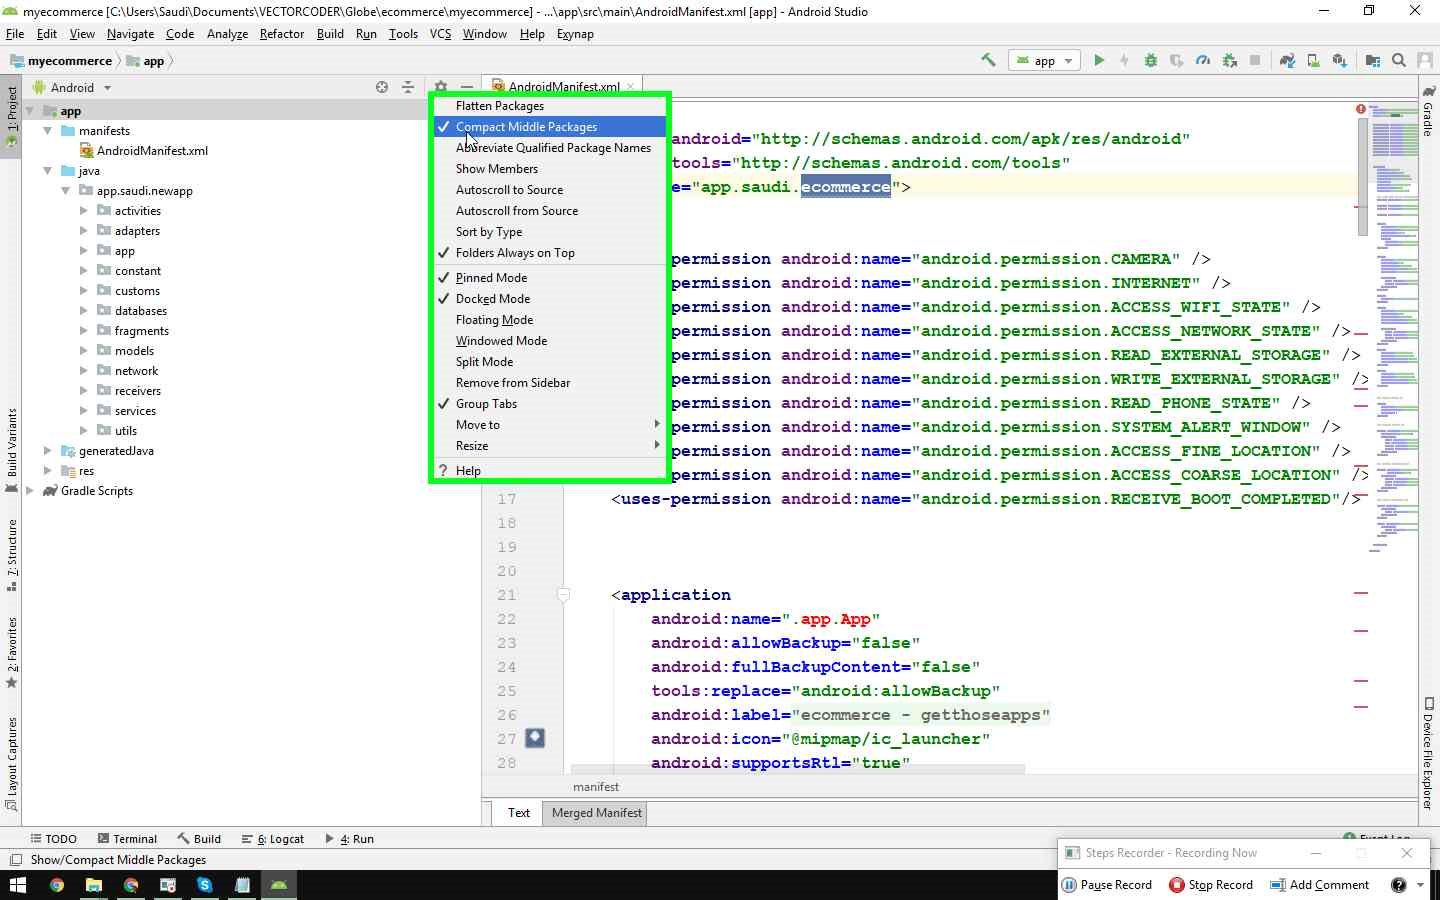
⦁ Next in the android studio project change the Compact Middle Package view from the little gear button as shown in the picture bellow
⦁ and right click on the folder you want to rename and click Refactor -> Rename and change it to the new one. and hit OK
 se
se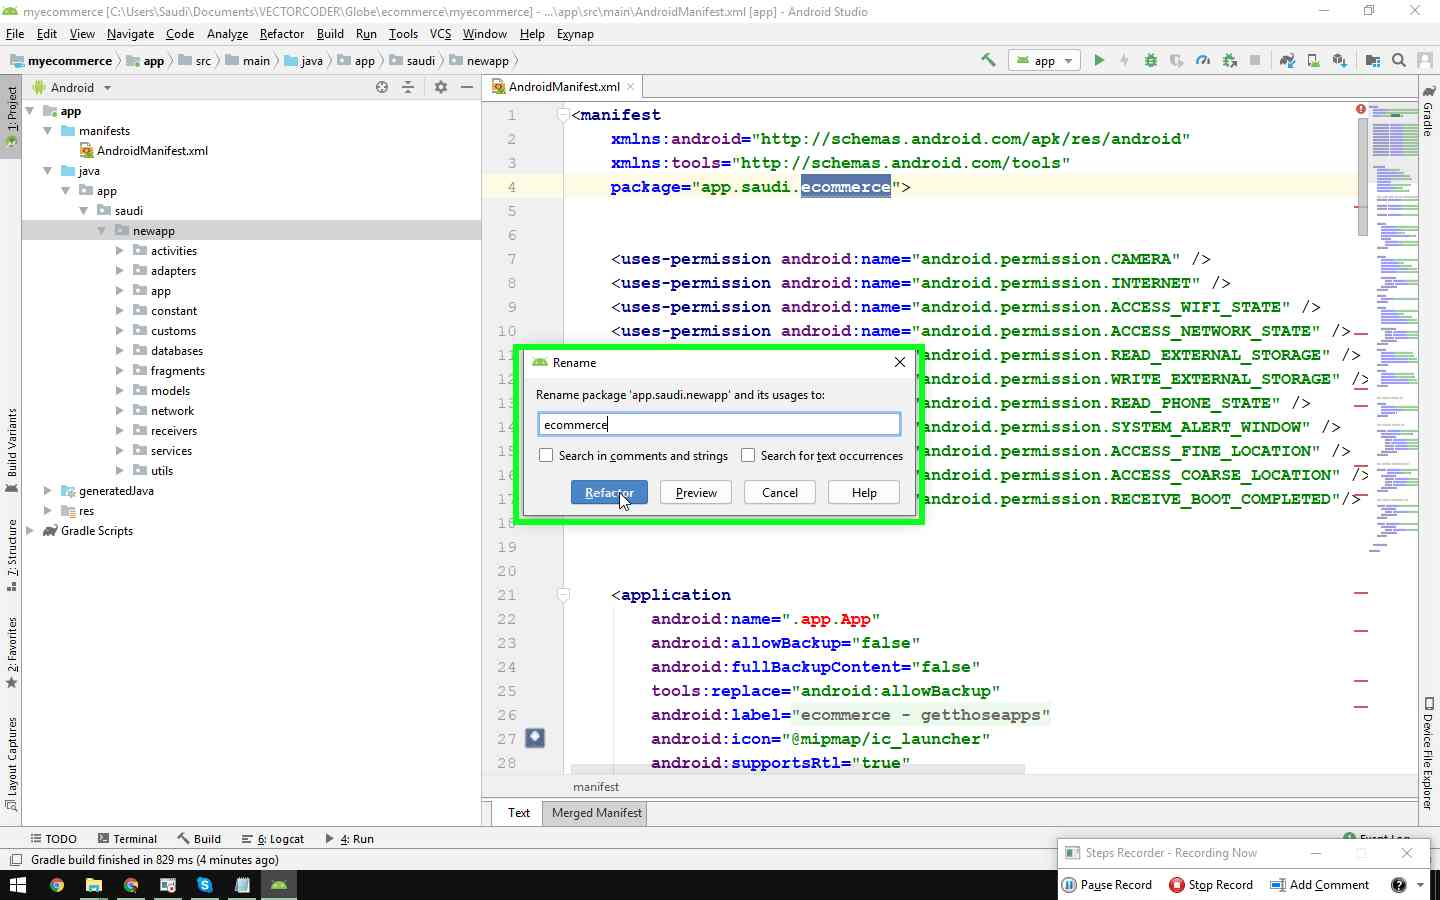
⦁ Next Click on Do Refactor if prompt.
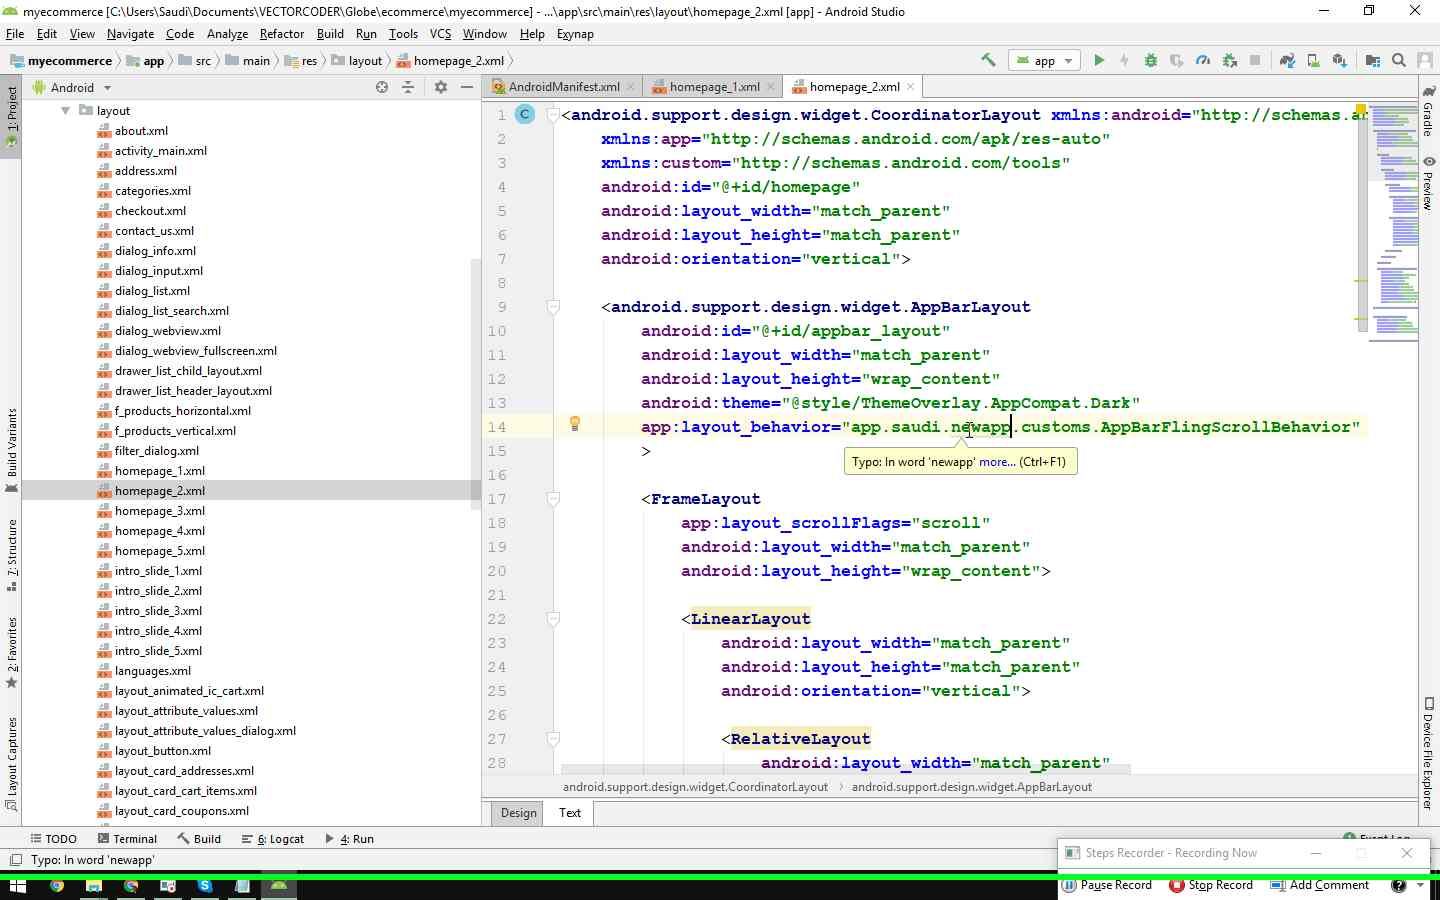
⦁ Next also change some files from the res -> layout folder .
1 – homepage_1.xml
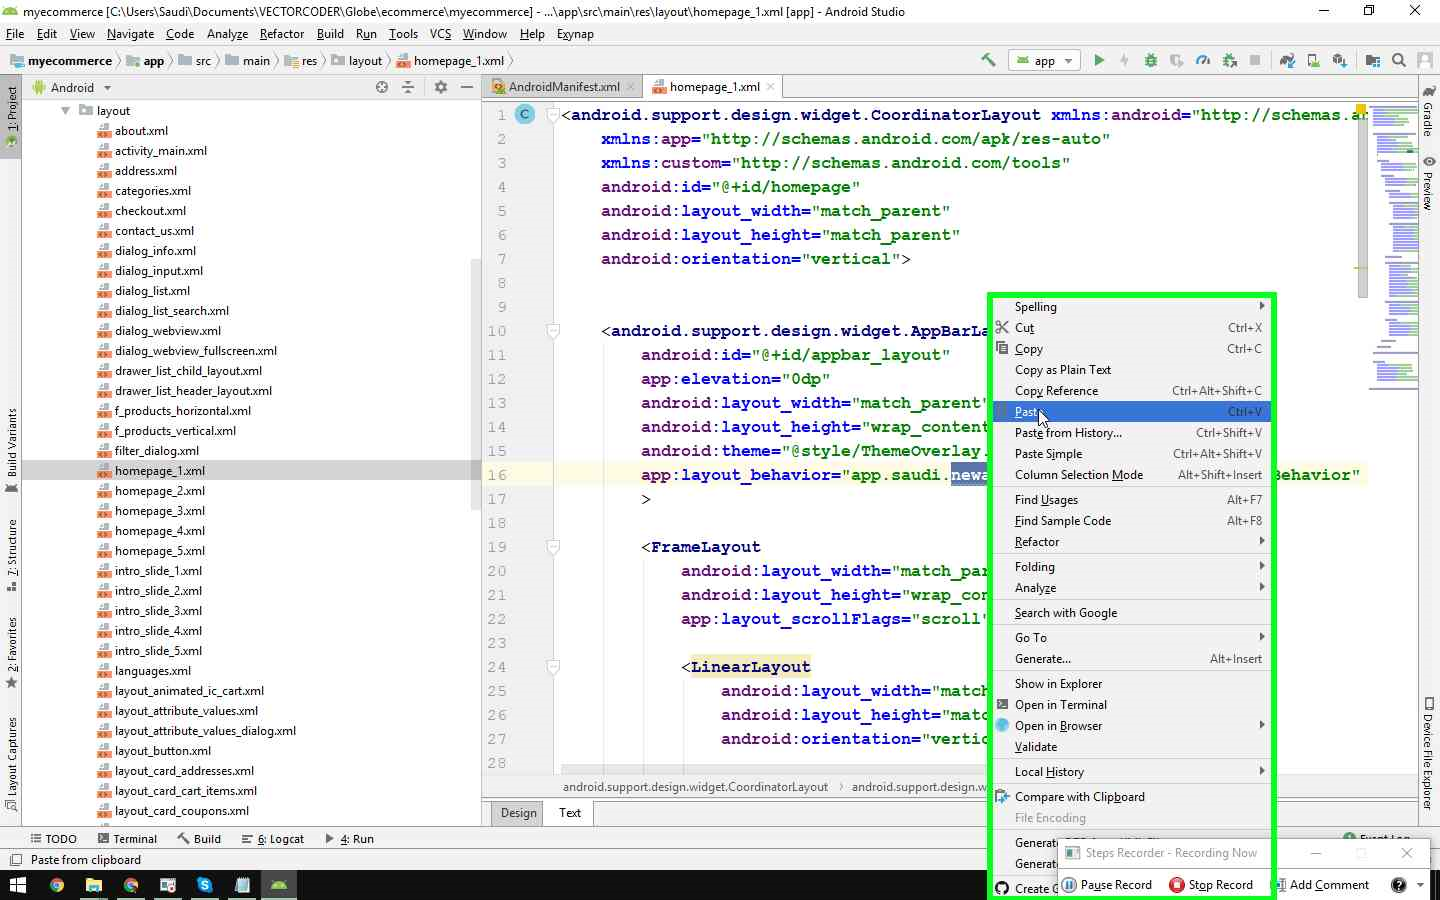
2 – homepage_2.xml
3 – news.xml

⦁ Finally click the build and rebuild the project.